Good morning! Somehow the calendar is playing tricks on me and it's almost April- March was just a blur! That little reality check means that Easter is almost here (not to mention tax tine-boo, hiss!) and I need to get working on Easter cards. I think my kids have caught onto the Easter bunny deal (they are 8 and almost 12 after all-lol!) but they still enjoy the egg hunt and all the candy, of course:) My absolute favorite bunny images come from illustrator, Zlatina, whose Etsy shop I frequent a lot! I bought a few of her spring/Easter bunnies and decided this guy was perfect one to start with.
I sized him to fit my card using Photoshop Elements, printed him on Whisper White card stock using my Epson 3800 printer and heat set the image before coloring him with Copic markers. I printed another image onto Close to Cocoa card stock, stamped over the image with a "Canvas" background stamp and cut out just the basket to paper piece over the colored image- it's a much more realistic texture to the basket and better than my coloring would have done!
The image was cut out so that his ears fall outside the cut lines and added some grass cut with a great little grass die from MFT. I sewed layers of paper from the "Tickled Pink" collection by MME together and added silver brads, some wrinkled ribbon and a yellow button tied with baker's twine. I wracked my brain for a cute greeting and came up with "Got Eggs?". A little search of the internet yielded the "Got Milk?" font and voila- it was done!
A smaller version of the bunny image is on the inside, along with a greeting using the same font and some more of this great flower-power paper- so springy!
Hope you're having a great day-
Supplies:
Stamps: Eastern Bunny (Zlatoena), Canvas background (retired SU)
Paper: Close to Cocoa, Soft Sky, Whisper White, "Fine & Dandy- Tickled Pink"-MME
Accessories: SU: Medium oval punch, Scallop circle punch, Curly Label punch, Big Designer buttons, silver brads, dimensionals; wrinkled ribbon, Baker's twine, grass die (MFT), Copic markers
Thursday, March 31, 2011
Saturday, March 26, 2011
Bubblicious!
Good morning! It's finally so nice to have a quiet Saturday morning with no where to go, nothing big on the agenda and nobody sick in the house anymore-yay!! On top of this, hubby and I got to go out for a date night last evening which makes this an even better start to the weekend:)
Onto my card for the day~ I purchased a bunch of digi images about a month ago and decided to take this adorable image from Michelle Perkett, aptly called "Cutie Patootie Birthday Mermaid", out for a spin.
Not a big stretch for those of you that know her, this image reminds me of Emily- sassy, sweet and swimming:) Her birthday is coming up fast so I might actually be ahead of the curve! I opened the image in Photoshop Elements, re-sized it to fit the space I wanted, then printed it on my Epson 3800. I usually heat set the image for a few seconds to make sure it's really dry before coloring with my Copics so there's no bleed from the image outline.
I used a color palette from this delicious MME paper set called "Dreamy 2"- I love this set so much I've been hoarding it for extra special cards-lol! I kept the layers and patterns pretty simple because I wanted the main image to stand out. I added some flowers cut out with the MFT flower die and a greeting from SU's "Teeny Tiny Wishes" punched out with the Curly Label punch.
The inside was finished with a computer generated greeting, some matching paper and more flowers with clear rhinestone centers- gotta have a little glitz on this girl's card:)
Hope you're having a relaxing weekend- I'm off to tackle my daughter's closet- I made need a search and rescue team to get me out!
Wednesday, March 23, 2011
Caught a bug??
I am finally rejoining the living after a horrid week with Influenza-yuck! My son and I were stricken on the last night of our ski trip (which made for a fun trip home from Colorado-not!) and have spent the better part of the last week with fever, cough, headache and generally feeling like we were beaten with a baseball bat:( Try to explain to the 8 year old why the shot I made him get last September didn't prevent this- he's feeling a bit gypped!
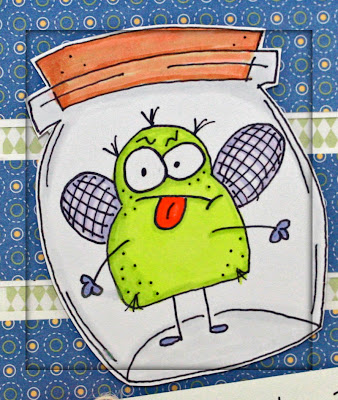
I was looking for a bug in a jar image to make him a "get well" card, but couldn't find exactly what I wanted (or what I thought this flu bug should look like) so I decided to draw my own. Now to be fair, I had a lot of inspiration from Anna Wight's bug and several others, but this one was completely hand drawn by me- no tracing, no cheating!
I started with a pencil drawing on Whisper White CS, then outlined the image with my 0.3mm Copic multiliner when I had the image the way I wanted it. I scanned the original so I could resize it and print it again if I didn't like my coloring the first go round.
I used Jen Del Muro's sketch from I {heart} Stamps and paper from a very old pack called "Rebecca". The little circles in the pattern remind me of what viruses "actually" look like- geeky, I know! The greeting was computer generated and accented with a red button and twine.
The inside says it all- "Feel better soon!!" During the worst of it, my poor son just cried and asked "when is this gonna be over?!" Luckily he's on the mend now and feeling a bit back to himself and can find some humor in my little flu bug:)
Hope you're having a great day- I feel a nap coming on...
Wednesday, March 9, 2011
5-minute wedding...
Good morning! I can't quite believe it's been a week already since my last post, but life's been a bit crazy around here to say the least! I was reminded of the time that had gone by when I received several messages from people wondering if I was OK- are you sick or what??!
The last week has been filled with a trip to Atlanta for work (fun but exhausting), a long weekend camping trip with my Girl Scout troop, now a crazy week at work and scrambling to leave for our annual ski trip tomorrow-whew! I am going to fall apart on that plane tomorrow!
To add to the start of a busy morning, my son needed a card to go with the wedding shower present for his teacher- hence a 5-minute wedding card was born!
I like to trade stamped images with friends- this expands my repertoire, while keeping my stamp closet {somewhat} sane. I used the image and greeting from the MFT set "It Must Be Love" that I recently swapped- perfect for a quick card! I quickly colored her with Copics and added glitter from a clear Spica glitter pen to her diamond- so sparkly IRL! A few layers of paper from my scrap stash, some ribbon and rhinestones and it was done. Nothing fancy, but quick and cute! I would show you the inside, but my husband whisked the card out of my hands while rushing the kids out the door for school- the nerve!
That's it for me today- hope you're having a great day!
Tuesday, March 1, 2011
Happy Day...
Good morning! Hope you're all enjoying some nice weather where ever you are~ spring has certainly hit south Texas and everything here is starting to bud and leaf out!
The ladies over at CDAC (Center for Digital Art Center) have posted a Digi Freebie challenge and there are lots of great free digital stamps up for grabs from a variety of artists. I chose to use an image from a different challenge there which was to use two different prints/patterns in your card design and it included this free cute cupcake image!
I printed the cupcake on Whisper White card stock using my Epson 3800, heat set it for a few seconds and colored it with Copics. I had picked my papers first, so I had a palette of colors to work with- there is nothing more annoying than getting an image colored and not being able to find paper to go with it! The image is layered onto a piece of Poppy Parade and Early Espresso cut with a nested scallop die.
I used paper from My Mind's Eye "Just Dreamy 2" collection and pieced it together with straight and zig zag stitches. I used the "Unscripted Sketches" challenge as a guide for my patterned paper with my inspiration from The Spotted Hen's card "Here's To You". I tied it all up with some wrinkled ribbon, a button from the new "Sweet Stitches" Big Designer Buttons collection and some baker's twine from the Twinery. The computer generated greeting was punched out with the "Curly Label" punch.
I used the same image on a smaller scale and at 50% opacity for the inside, along with a computer my own greeting- kinda ties the inside and outside together! A strip of the flowered paper (which qualifies it for the Crazy For Challenges- Use Flowers Challenge:) and some Poppy paper cut with the Open Scallop Border die from MFT and it was done!
Have a good day!
Supplies:
Stamps: Designed2Delight "Spring Cupcake"
Paper: Whisper White, Early Espresso, Poppy Parade, MME- "Just Dreamy 2"
Accessories: Open Scallop Border die (MFT), Scalloped rectangles die (Spellbinders), Copic markers, wrinkled ribbon, Baker's twine, SU: Sizzix Big Shot, Curly Label punch, Big Designer Buttons, dimensionals
Subscribe to:
Posts (Atom)